Vintage caravan restoration – 1974 Viscount Royal ‘Sage’
A far as caravan restorations go, this rebuild of a 1974 Viscount Royal named Sage is about as immaculate as any we’ve ever seen here at RV Daily. The extraordinary transformation by Dominic Wood will serve as the family home…
A far as caravan restorations go, this rebuild of a 1974 Viscount Royal named Sage is about as immaculate as any we’ve ever seen here at RV Daily. The extraordinary transformation by Dominic Wood will serve as the family home while he and his tribe travel around Australia. Talk about doing it in style…!
Having lived in a Jayco Swan full time since February 2018, Dominic had a pretty good idea of what he and his family wanted in their first caravan so they decided that a rebuild was really the only way to achieve everything how they wanted it to be. Once completed, the restored Viscount Royal caravan would be their family home for at least the next couple of years as they continue to travel around Australia.
We’ll let Dominic tell you about his incredible rebuild:
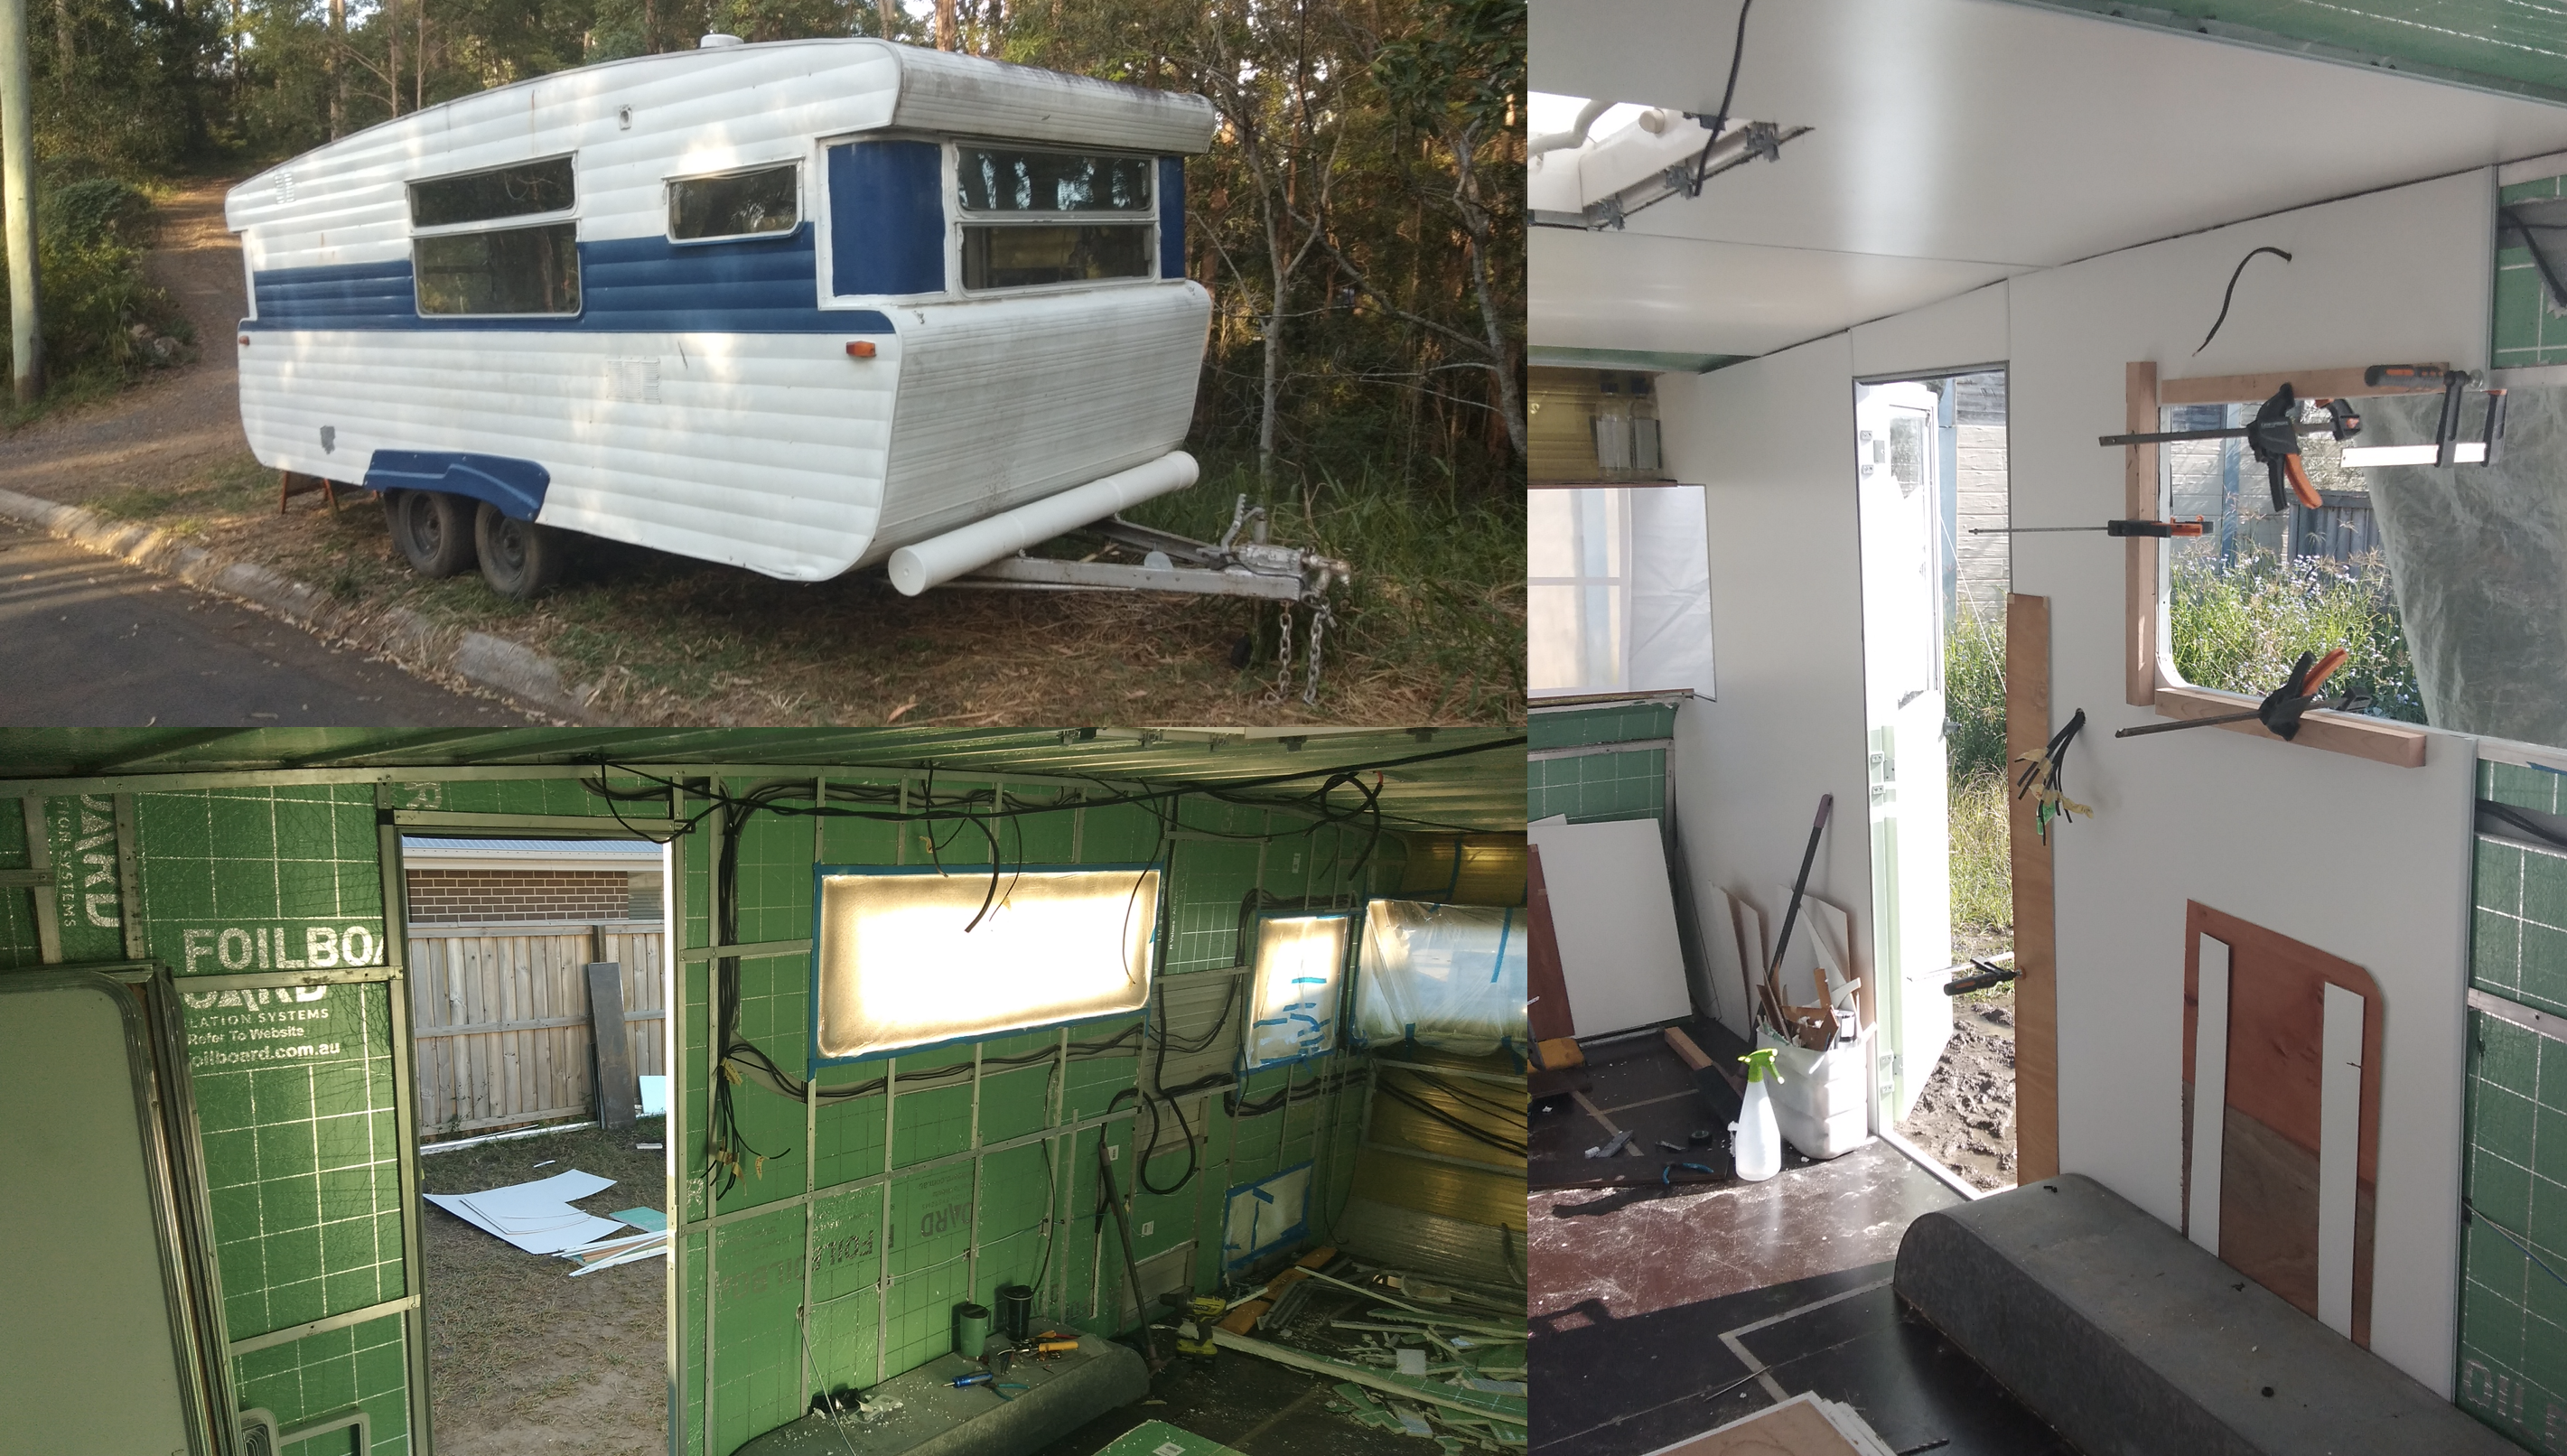
We’d never attempted anything close to the scale of a complete rebuild and it was only 3 days between deciding to purchase an old caravan, and starting work on the rebuild once we bought the van for $2050 from just a few kilometres away. With only basic hand tools and a few Ryobi 18v battery tools, we started the rebuild on a vacant block of land owned by a friend. What we originally estimated would take 8 weeks and around $10,000 to complete, very quickly raced past both of those budgets.
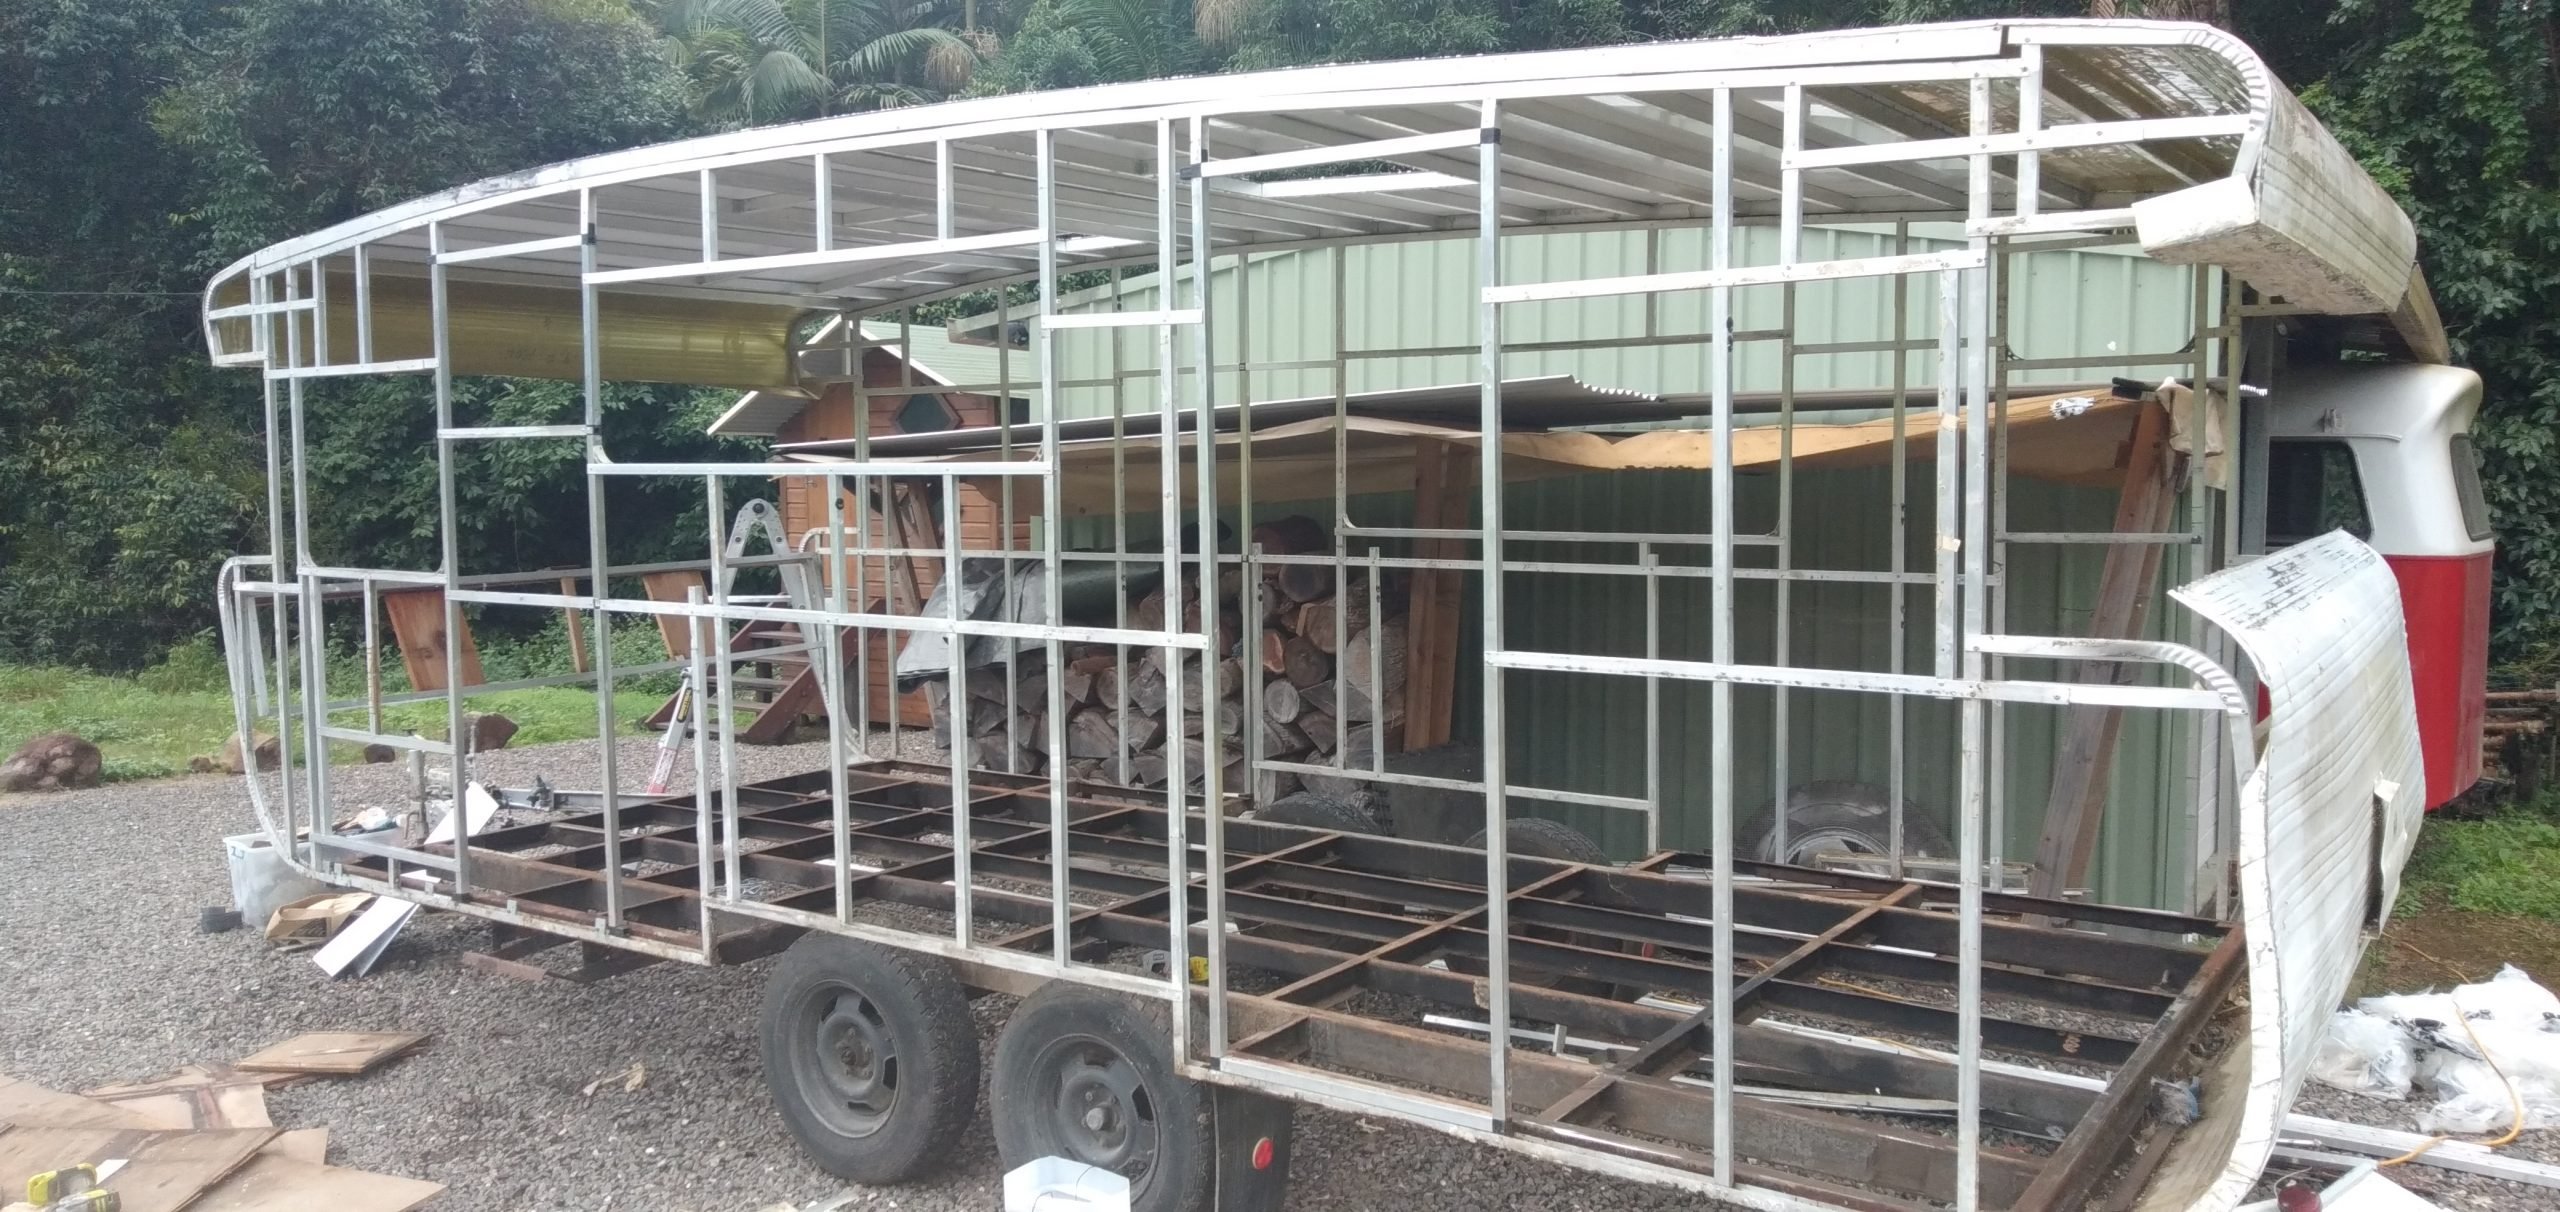
You know this is going to be a serious restoration when you strip the van down to the frame.
The rebuild took a total of 1200 hours over 148 days, from April 30th to September 30th 2020. During that time, I had just 5 days where I didn’t work on the van. On top of that time was research and learning, as well as ensuring that all the compliance was adhered to so that final registration would be possible.
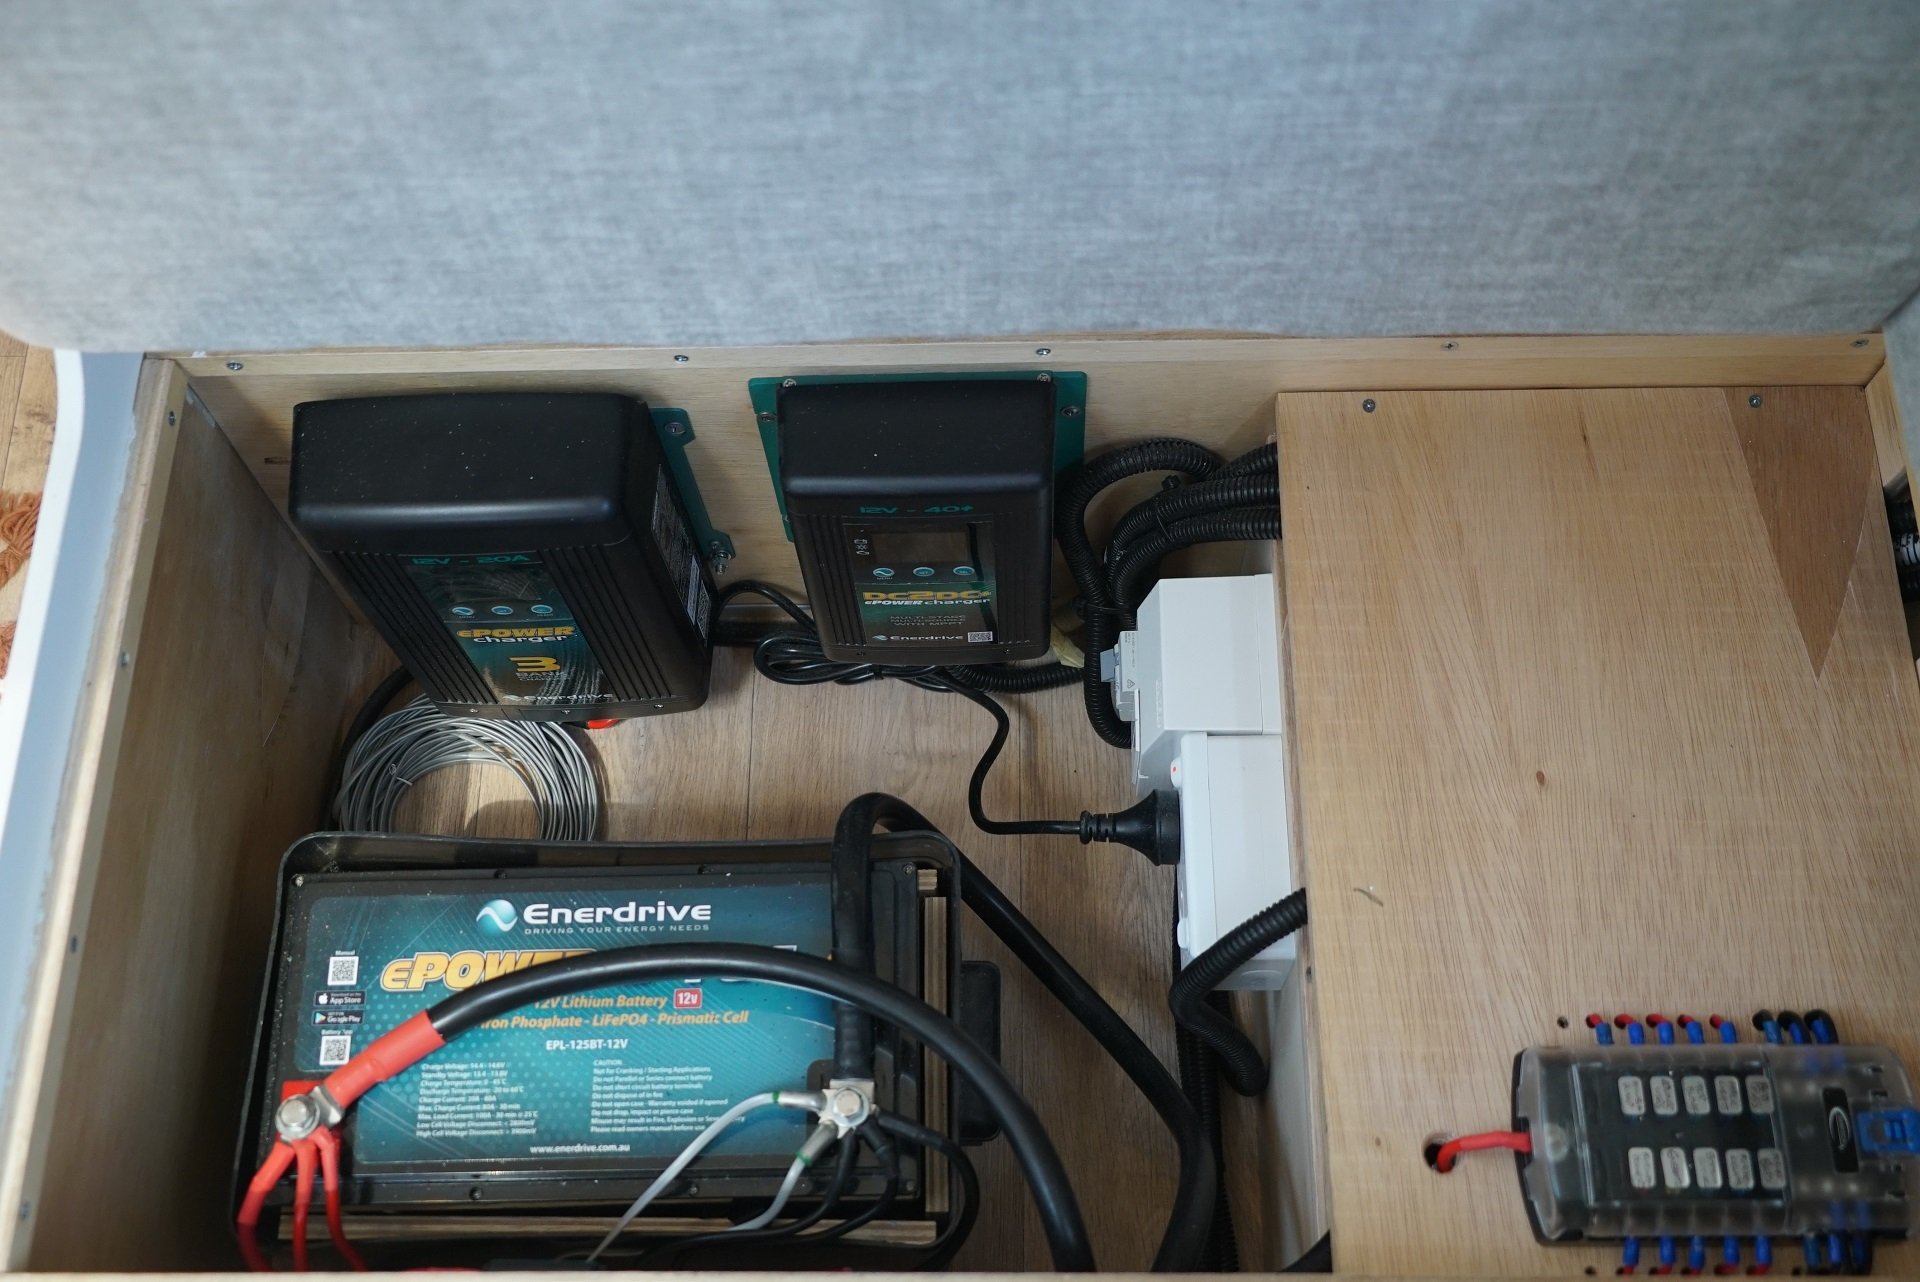
The van has 4 water tanks. 3x 110L for drinking & showering, and 1x 110L grey tank. Over the past 3 years, we’ve lived almost exclusively off-grid in the Jayco so a good power set up was essential and actually accounted for 10% of our total build cost. We opted for an Enerdrive Lithium battery with matching Enerdrive DC/DC & AC chargers, as well as an Enerdrive 2000W inverter with AC transfer switch. The AC transfer switch allows us to run all the power points in the van from the inverter even when we’re not connected to shore power. Without AC transfer this wouldn’t be possible and we’d only be able to use the single power point on the inverter itself. The battery is charged exclusively by 2x 250W solar panels on the roof which output around 25A at their peak.
Old van – new tricks. The Enerdrive Lithium system provides all of the family’s off-grid electrical needs.
We use 12v solenoid valves to select which water tank to draw from, and which tap to send to with the flick of a switch. One of my favourite design ideas in the van is concealing all of the switches, dials and gauges behind a false wall on one end of the couch so that we don’t have to see them all the time but they are easily accessible.
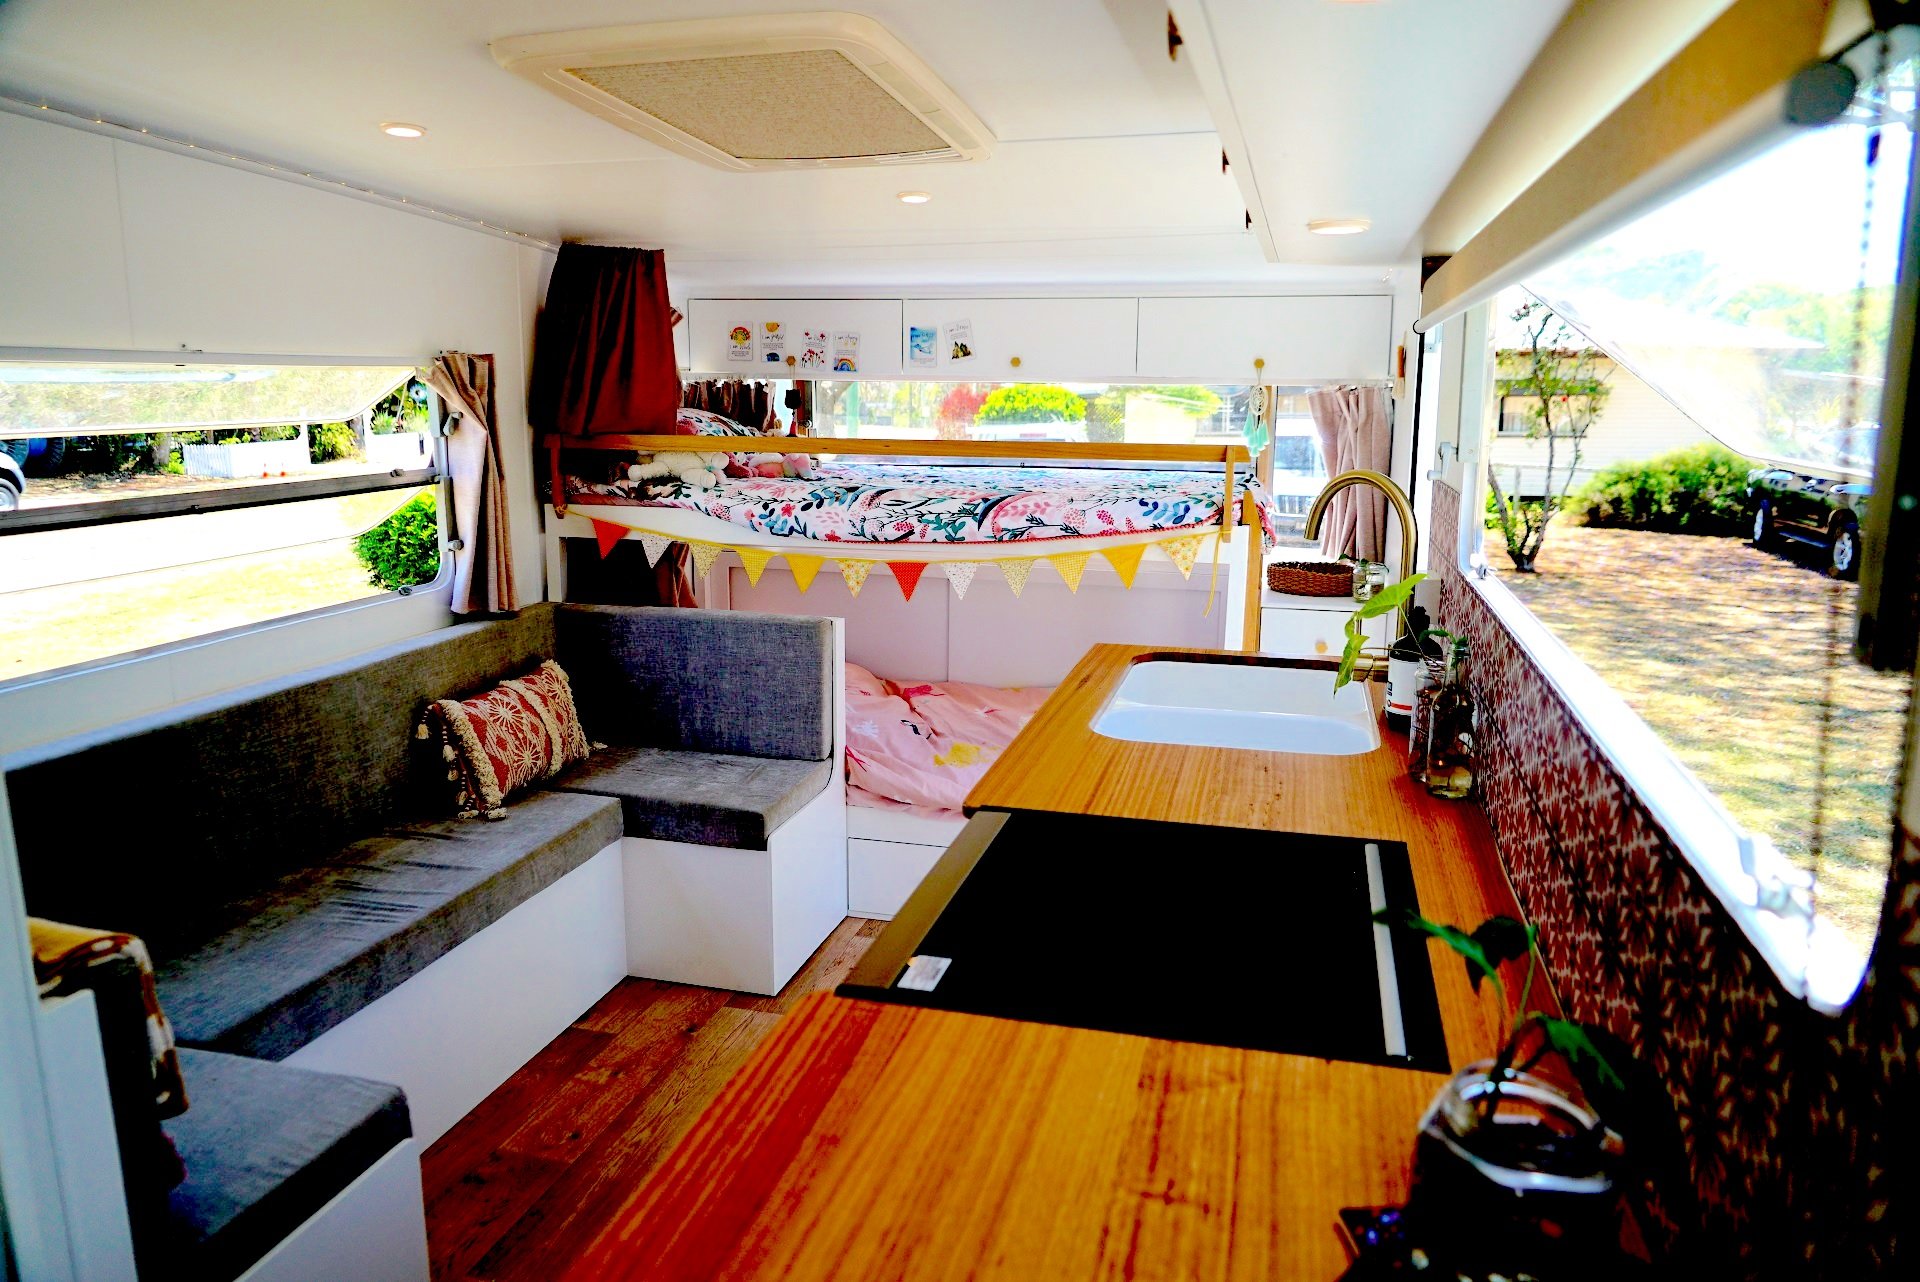
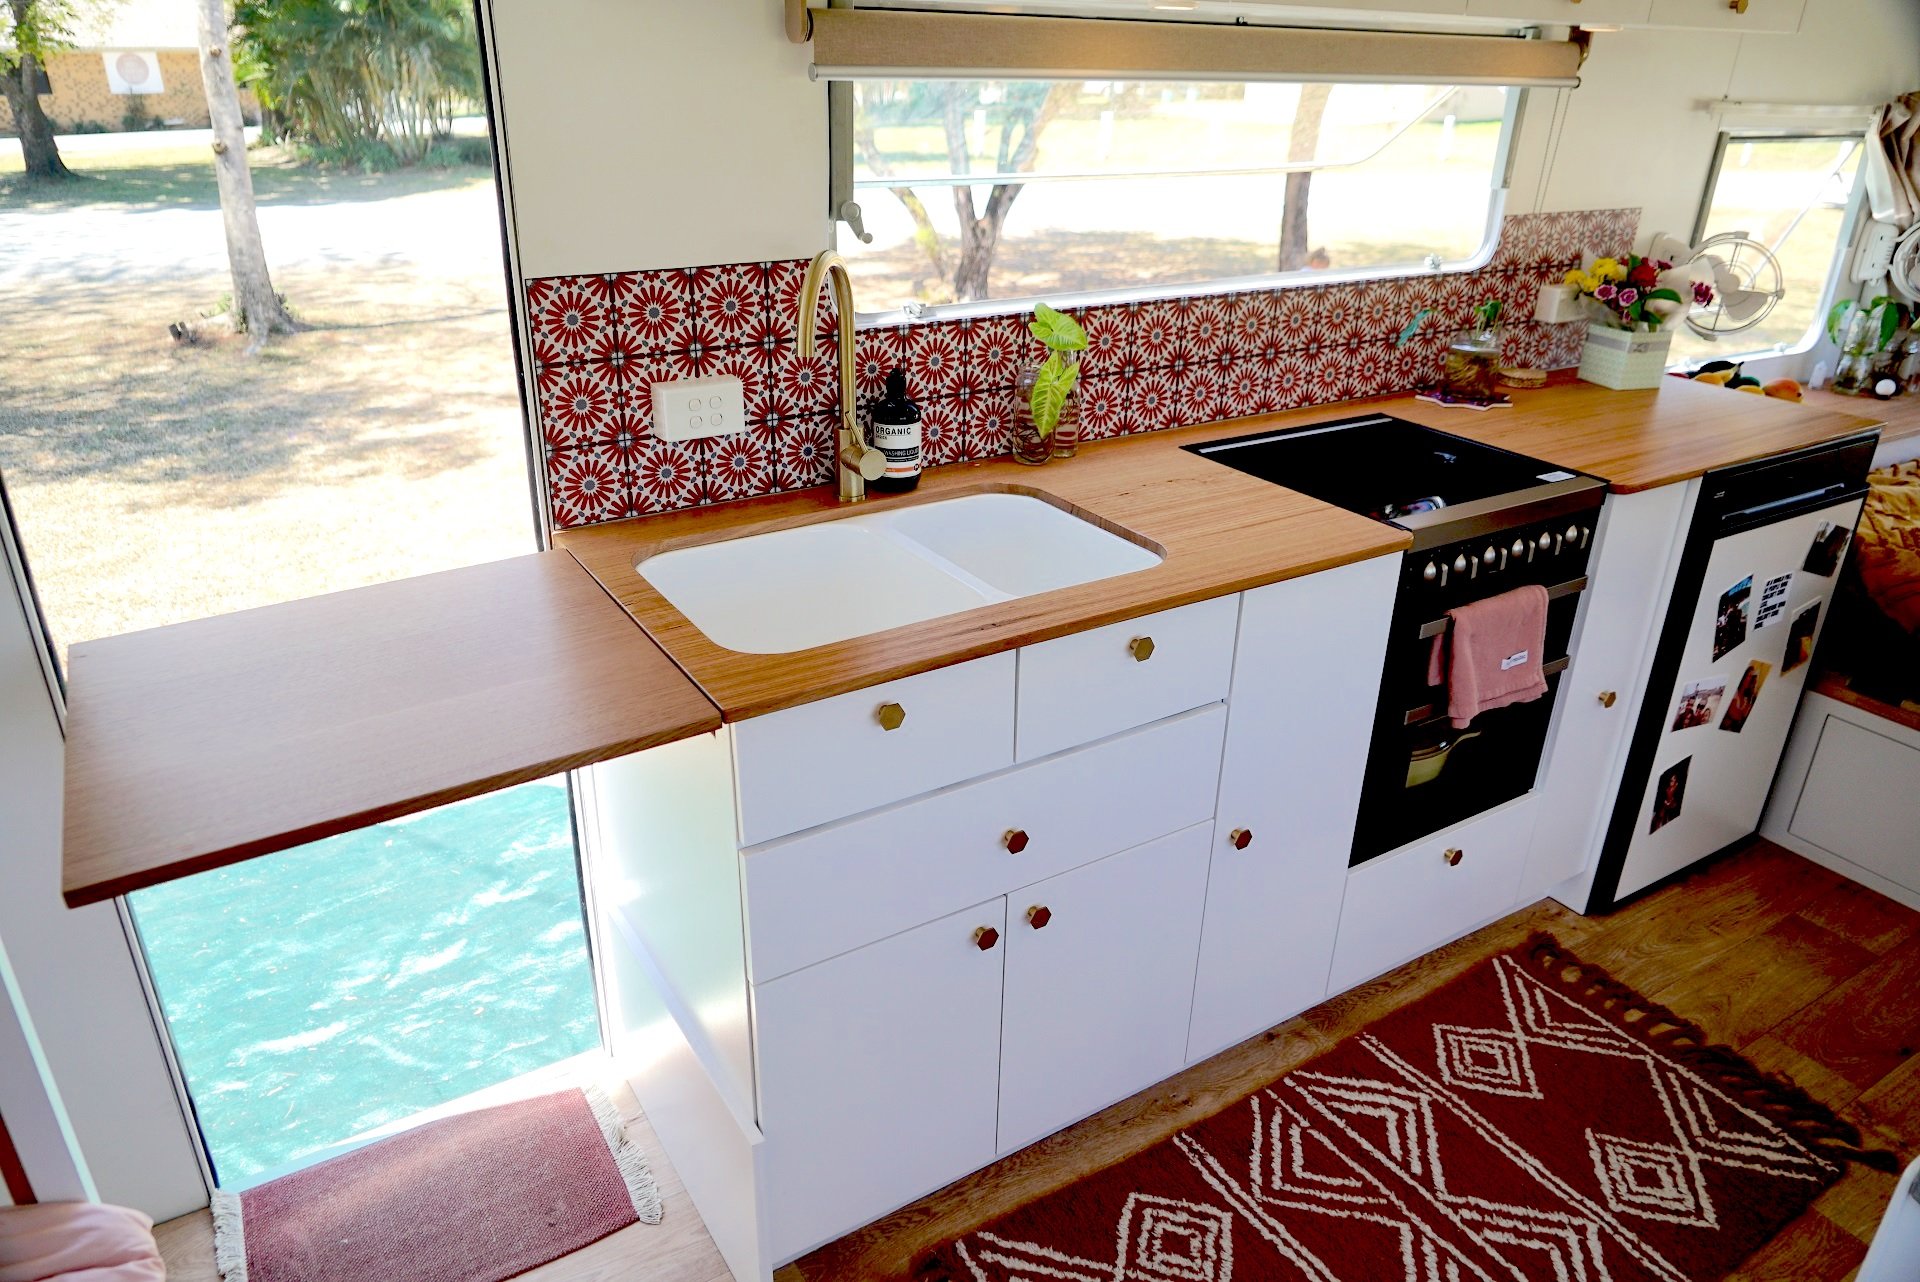
We have a 2300mm club lounge (which houses the electrical set up, water pump and heater), a 2440mm kitchen bench with 600mm fold-up extension table (a very handy extra surface!), full-size double bed, full-size single bunks, 128L Thetford 3-way fridge, Dometic 4 burner gas cooktop with grill and integrated oven, 900mm x 800mm ensuite with Thetford bench toilet and shower above.
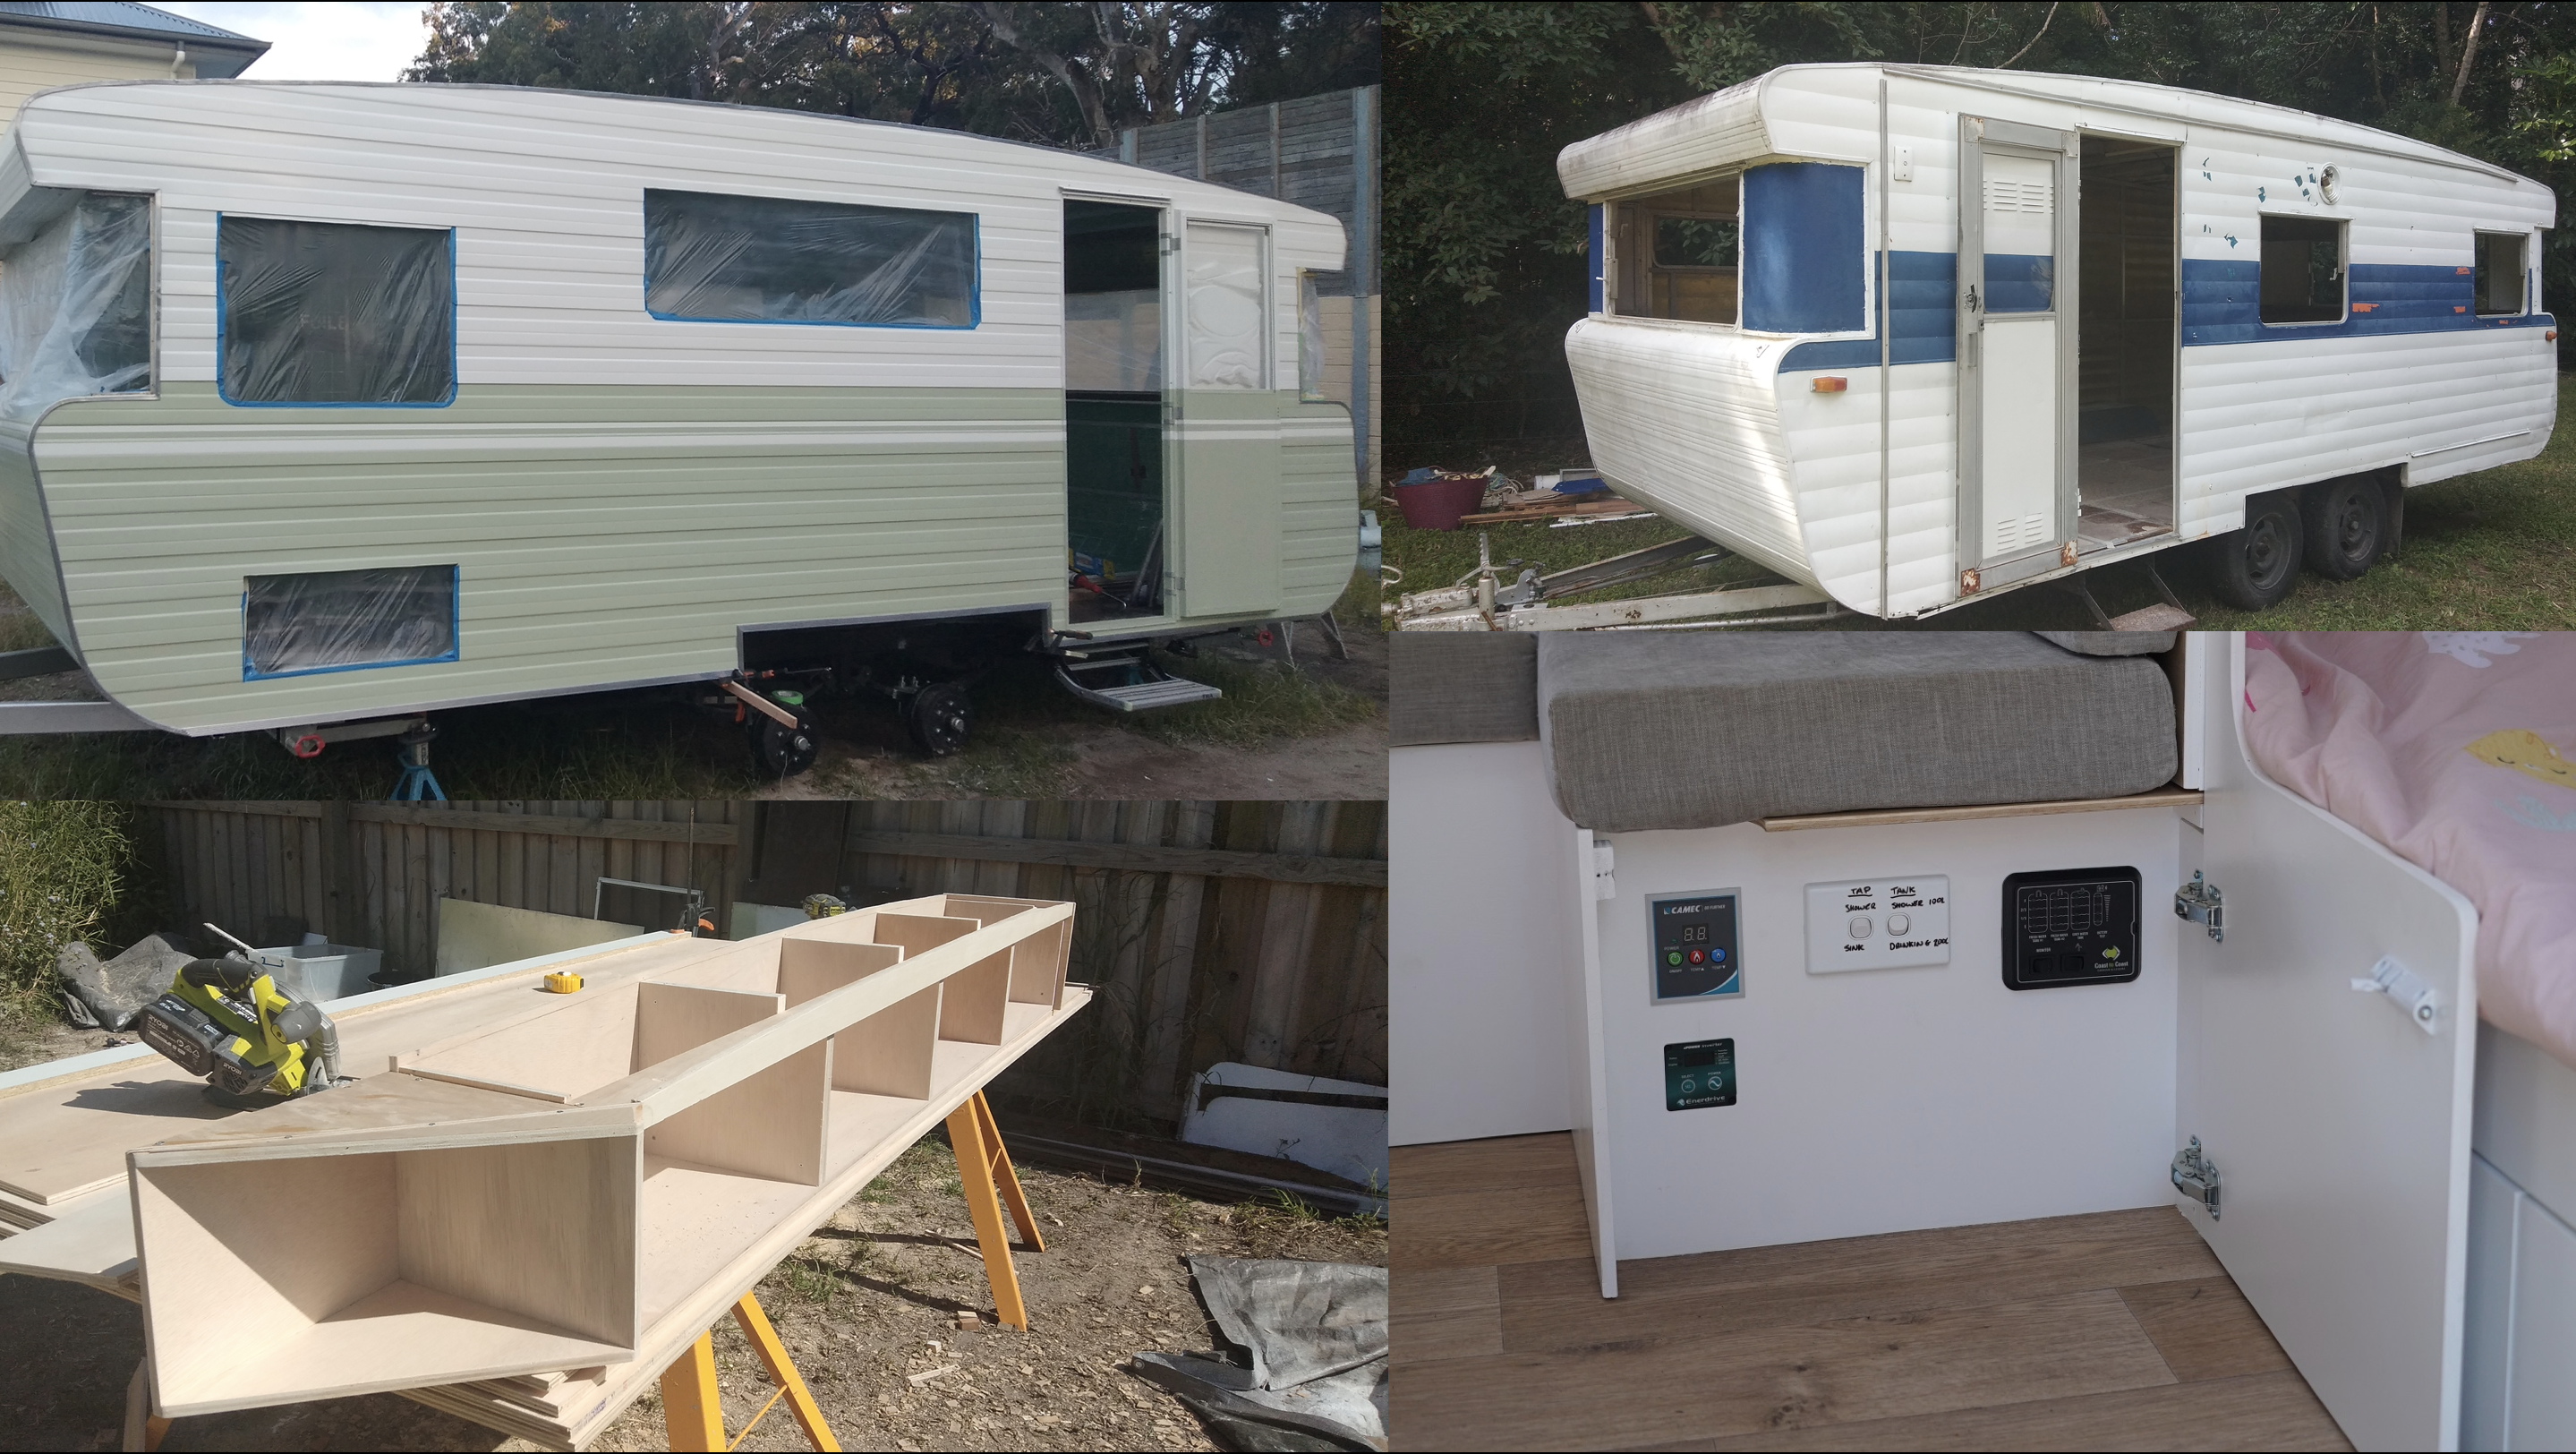
The new colour scheme looks infinitely better than the original. The Ryobi power tools got a good workout on the cabinetry. The concealed electrical board is a once touch.
Our hot water is heated by the Camec Instantaneous Hot Water system, which heats water directly from the caravans tanks without having a small holding tank built-in. This gives us the ability to have virtually endless hot showers when we are near a water source as we can also pump from an external water source straight to the water system. Our awning is a 4m Fiamma F45S Wind-Out awning.
All our lighting is by Narva, with warm white being our colour of choice. In fact, I couldn’t find a single warm white external awning LED in a white casing so I ended up ordering that from the UK. All the kitchen and overhead cupboards have internal lights which turn on as you open the doors. We also have 4x Sirocco fans.
The interior is a very pleasant place to be. The big windows and simple, open floorplan give the impression this van is bigger than it is.
The frame of the van is aluminium which makes it incredibly strong and easy to work with. The only timber in the van originally was in the roof, but it had all rotten so I replaced it with 40 x 25 x 3mm aluminium tube. Then the entire roof was replaced including roof battens and sheeting (which is now aluminium composite board), making space for air-con provisions (although we haven’t installed that yet), a 700 x 500mm Dometic skylight and a 12v exhaust hatch in the ensuite.
During the initial stages of the build, we were very much limited by the location of the wheel arches inside the van. This meant that we had to move the door from in front of the axle to behind it so that the fridge and shower weren’t on top of the arches! Once you move the door, all the external cladding needed to be replaced, which meant we could then also move all the windows to exactly the right spots (although this was a bit of guesswork at the start as we didn’t have exact dimensions of everything at this point in time).
The parent’s bed at the opposite end to the kids’ bunks affords some privacy. A combo shower – toilet is neatly packed inside that large cupboard.
The original log pile style cladding of the ’70s wasn’t available so we used Allytech in Victoria to supply our new cladding. Most local caravan repair shops in our area charged $200-$250 per 6m length of cladding, making the cladding alone around $4000 as we used 15 lengths. Allytech’s price was around $50 per 6m length, making a total of around $750. Freight to Queensland doubled this price but was still significantly cheaper than anywhere local.
As the original rubber torsion suspension and mechanical brake systems had both seen better days, we opted to replace both. With extensive help from Dave at Huntsman Products in Victoria, we now have a 2.5T rated roller rocker suspension system with 10″ electric brakes. Our favourite McHitch coupling is also installed at the front of the van. If you haven’t seen this style of hitch before, it is absolutely phenomenal and a complete life & marriage saver.
One other company who I would like to commend is Shaka Welding on the Sunshine Coast. The only part of the build (except 240v and gas) that I didn’t do myself was the welding. Devan from Shaka Welding worked a 10 hour day in the rain and mud without a single complaint to get all the work completed in one day. This included welding the new suspension in place, a completely rebuilt and extended drawbar, custom rear bar to carry our 2 spare tyres, new step location under the new door, 4x wind down leg brackets and a couple of spot welds on the chassis where the old door used to be. It was a mammoth day, and I couldn’t be more grateful or impressed with Devan’s work ethic and passion.
Check out how much bench space is available in the kitchen. The fold-up extension is brilliant.
One of the things we get most comments about when people see our van is the kitchen splashback. It’s a vinyl sheet stuck to 3mm acrylic which in turn is siliconed to the wall. The vinyl is from BleuCoin on Etsy. They were fantastic to deal with, have hundreds of designs and print to your exact custom dimensions so it’s exactly how you want it. Highly recommend.
One of the hardest things about the entire build was the amount of forethought that has to go into every little detail, as well as ensuring that all the compliance is adhered to (especially rules surrounding running 240v cabling and gas compliance). Facebook proved to be a fantastic resource for information from people who have previously done this type of project, as well as hundreds of hours of YouTube tutorials and videos that I watched when I wasn’t physically working on the van itself. (this included sewing all the curtains and cushion covers myself)
The old Viscount looks nothing like it did when Dominic first bought her. It took a lot of work to get it to the state it is in today.
As with anything, there are a couple of minor things I’d do differently. Firstly, I would have used timber in the roof again instead of aluminium as we do get a little condensation on the aluminium battens in the mornings. Naturally, this wouldn’t happen with timber. I would also have had the original windows sandblasted and powder coated instead of spending almost 100 hours polishing them up – they do look great but was definitely the worst part of the build. Overall we’re extremely happy with the result – I’m sure there will be things we’ll tweak over the next couple of years but after having lived in it for a few months we’ve found everything is working well and the space works great for us.
Our final weight including 330L of water and 18kg of gas is 2114kg with an ATM of 2500kg.
Thanks very much for the opportunity to feature in the magazine! We’re incredibly proud of our tiny home and couldn’t imagine a more perfect way to show it to the RV world.
Full build details can be found on Dominic’s build page on Instagram or you can follow the family’s travels on the Our Days in Sage Instagram page.
If you have a caravan restoration or DIY build you think Australia would like to see, please let us know by emailing us at sayhello@rvdaily.com.au or use our contact page.