We show you how you can service the vital running gear on any caravan.
Words & Images Philip Lord
*You’re probably not a pro, so unless you’re handy on the spanners best leave this job to a professional. We’re all for saving a few bucks but not at the expense of safety. These tips are tops but aimed at the mechanically savvy. If in doubt, do not attempt the work!
A caravan’s running gear is very simple but not maintenance-free. You might not need to touch anything else on a caravan but giving the bearings and brakes regular attention is a must. A caravan’s tapered wheel bearings are not lifetime service items – they need to be checked for damage and either replaced or cleaned up and re-greased every 12 months or 10,000km. While the bearings are out, it’s an ideal time to check that the brakes are operating properly.
While you do see fancy electro-hydraulic disc brake systems on some big top-shelf vans, the majority run electrically-activated drum brakes. On these, you need to pay particular attention to the brake shoes, electric brake magnets and the inner drum surfaces – all easy enough to do when servicing the wheel bearings.
The first thing to do is make sure you’re up to the job – if you’ve never wielded a spanner before, now might be the time to reflect on whether it’s safer to leave the work to a mechanic familiar with caravans. The same applies with your work space – if you don’t have firm, level ground on which to lift the van, or room to work at the axles, you might be better off getting an expert to do the job. Even if the bearings, brake shoes and magnets (the key parts that wear out) are fine, you’ll need new split pins, bearing seals (one per wheel) and wheel bearing grease.
Caravans usually have Holden or Ford tapered bearings, but some vans like old Windsors have a combination of both. Be sure of what your van uses before you go shopping because Holden and Ford bearings are different sizes.
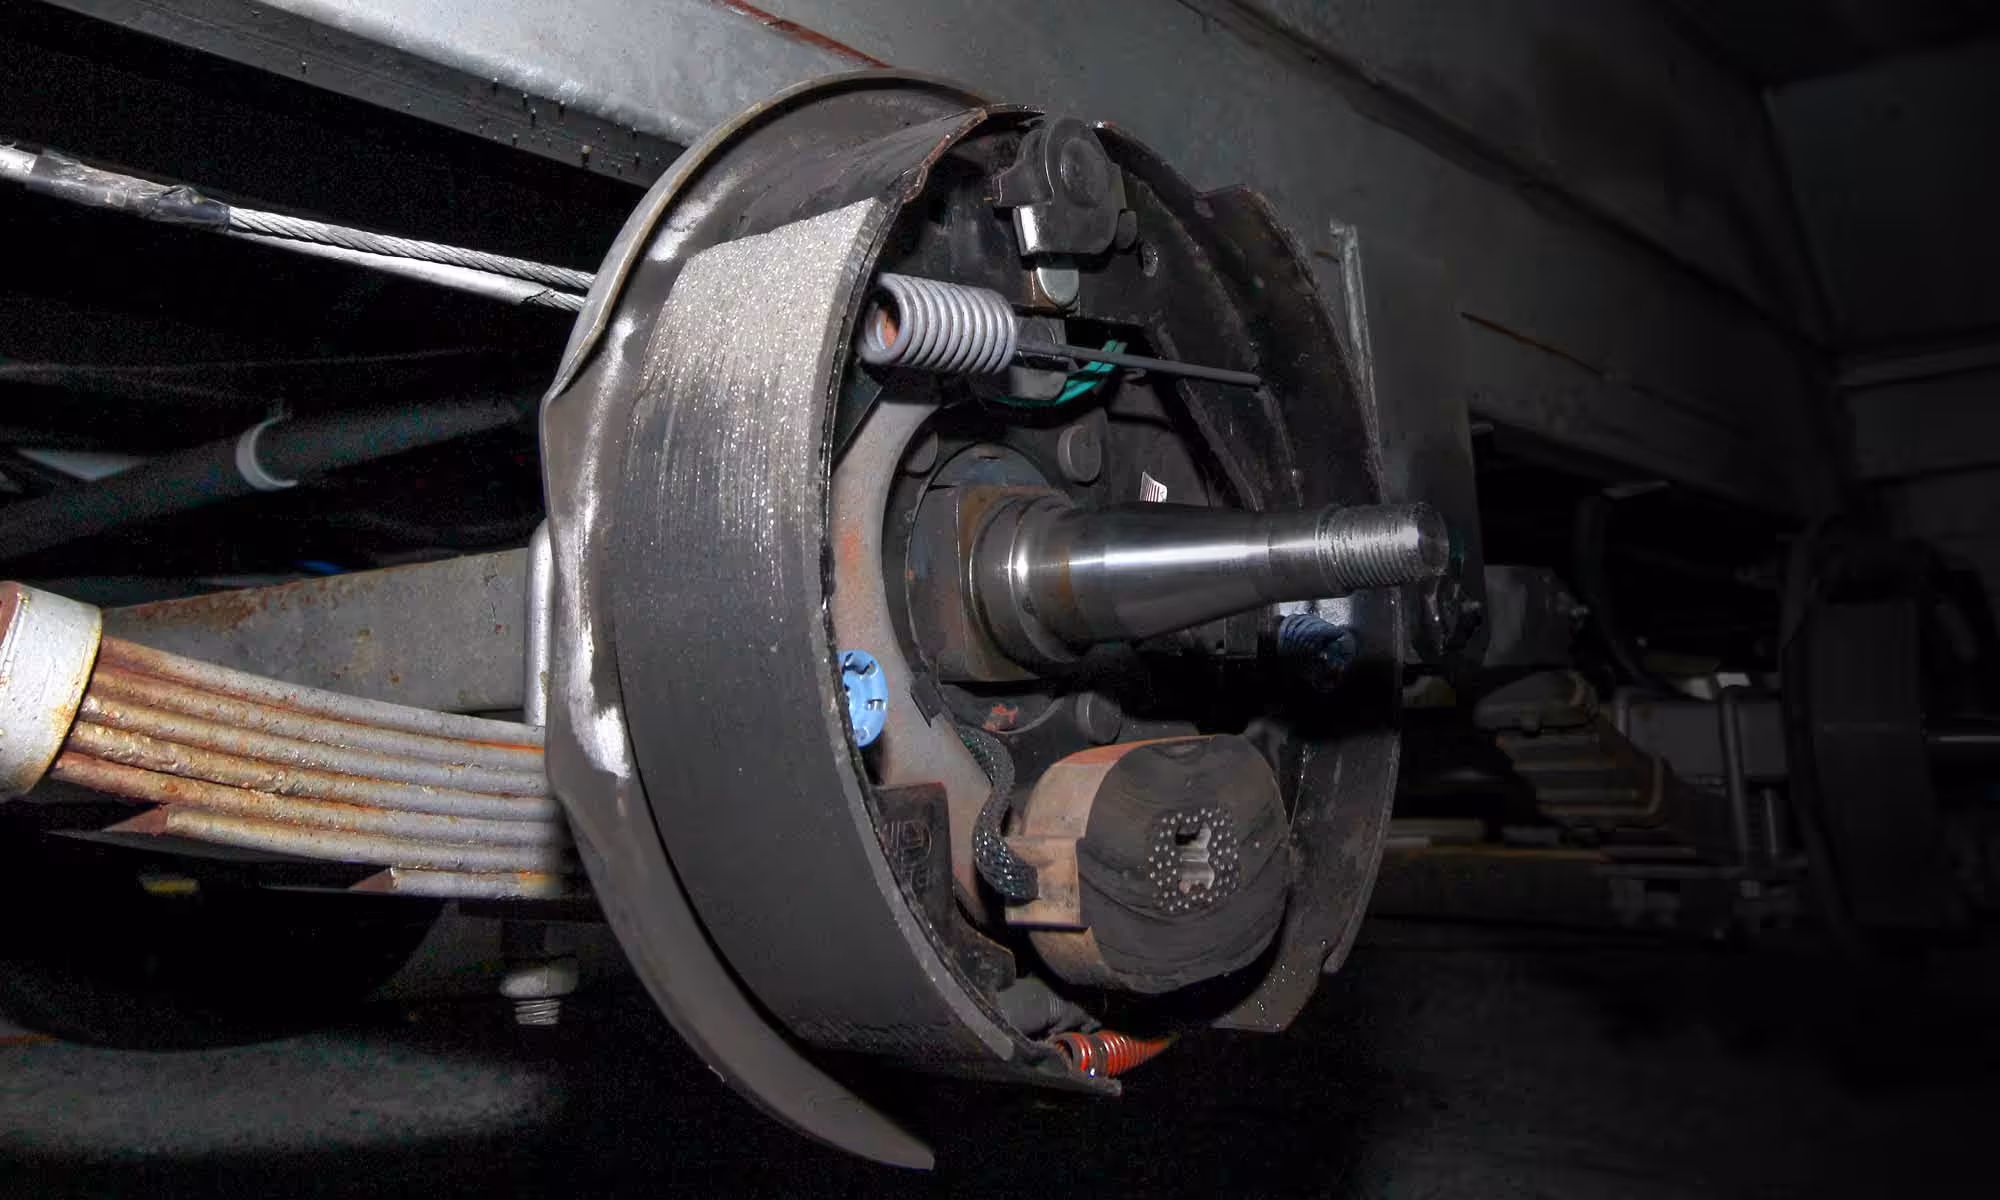
With the van parked on a level surface with the handbrake off, chock the wheels you’re not working on. Loosen the wheel nuts of the wheel you’re working on half a turn; then jack up the van and support the chassis with an axle stand. Undo the wheel nuts and remove the wheel, then prise off the bearing dust cover with a pair of multi-grips (or, if it is stubborn, by gently tapping with a hammer on a screwdriver). Dust caps are made of thin metal, so go easy on them to avoid damage.
Next you need to grab some thin-nosed pliers to straighten the split pin at the single ends; then remove the pin at the closed end. Remove the castellated spindle nut. Now you can pull off the brake drum. Be careful here, as while the bearings and seal will probably stay put you’ll have to catch the outer washer before it falls out.
With the brake drum off you can check the brakes for wear or damage. Look for worn or cracked brake shoes and for a worn brake magnet. A good magnet will still have the water marker indents on its outer surface. Also check for any breaks in wire insulation to the magnet. You can test if the magnet is activating properly by plugging in your vehicle and getting an assistant to apply full braking at the brake controller; then putting a solid metal component (such as a hammer head) on the magnet. The activated magnet should solidly hold the metal.
Now back to the bearings. With the brake drum placed on a clean work surface, carefully pry out the inner bearing and seal. Degrease the bearings, inner seal and outer washer in kerosene. Dry the parts (using compressed air, if you have it) to remove the remaining moisture. If you don’t have a compressor, use a clean cloth to wipe off as much of the kero as you can, rolling the bearing rollers to try to get out all the moisture. Leave the bearings for a while to allow the remaining kero to seep out, and come back to them later for a final wipe over.
Inspect the bearings for damage. What you’re looking for is pitting or scoring of the rollers, and any resistance to movement in the rollers. Also see if there is any blue haze on the bearing surfaces (suggesting excess heat). If you observe any of these things, get new bearings. Re-grease the bearings (using a high-temperature bearing grease) by pushing the grease in through the rollers by hand or by using a bearing packing tool (available at spare parts shops).
Clean the brake drum bearing surfaces thoroughly with a solvent such as wax and grease remover, and examine them for any scoring. The drums can be machined but it’s better to get new ones – they are relatively cheap.
Smear some fresh high-temperature bearing grease on the drum bearing surfaces and refit the inner bearing and new bearing seal to the brake drum, tapping in the seal with a drift so it sits flush. Wipe a small amount of grease on the bearing seal to ensure the rubber doesn’t grab when it’s back on the spindle. Fit the outer bearing and washer and mount the drum on the spindle (wipe the spindle with solvent first, if you see any score marks on the spindle, it’ll have to be replaced).
Tighten the castellated spindle nut, easing off and re-tightening a few times to let grease work its way into the bearings. Then tighten the spindle nut so the drum can still spin smoothly; and then ease off to the first notch on the nut. Now re-fit the wheel, tighten it with a couple wheel nuts and grab the wheel at the top and the bottom. You should feel a slight amount of play – if there’s none, the castellated nut is done up too tight; and if the wheel feels like it’s rocking top to bottom there’s not enough tension at the castellated nut.
Remove the wheel and fit the split pin so that the closed end is seated within the groove of the castellated nut, and bend one of the open ends up and over the spindle. Cut this section of pin where it protrudes past the spindle with pliers, and cut the other section where it protrudes from the spindle. Gently tap the dust cap back on with a hammer.
Fit the wheel and the wheel nuts and tighten them all so the rim is secure on the hub. Check the brake shoe adjustment by inserting a flat-blade screwdriver (or better still, a drum brake adjusting tool) in the opening on the lower drum backing plate. Turn the serrated shoe adjuster to adjust the shoes until the wheel can’t spin.
Lower the van, remove the jack/axle stand and tension the wheel nuts to 125Nm of torque. Remember to check wheel nut tensions again
after 100km.
With thanks to Barnes Caravans, 121 Hume Highway, Lansvale NSW 2166 (P: 02 9728 6366) for their assistance with this article.