We take a Projecta 120W portable solar panel and turn it into a roof-mounted panel for a camper, offering dual-purpose flexibility for solar power.
By Anthony Kilner
It was November 2015 when Jane and I drove out of the Ultimate Factory in Moruya, NSW with our fully reconditioned camper. We had purchased the camper from Jane’s mum who had owned it since new in 2007 and a refresh was definitely needed. The camper had travelled over much of Australia with the outlaws, and now it was time for us to create our own memories and start travelling afresh.
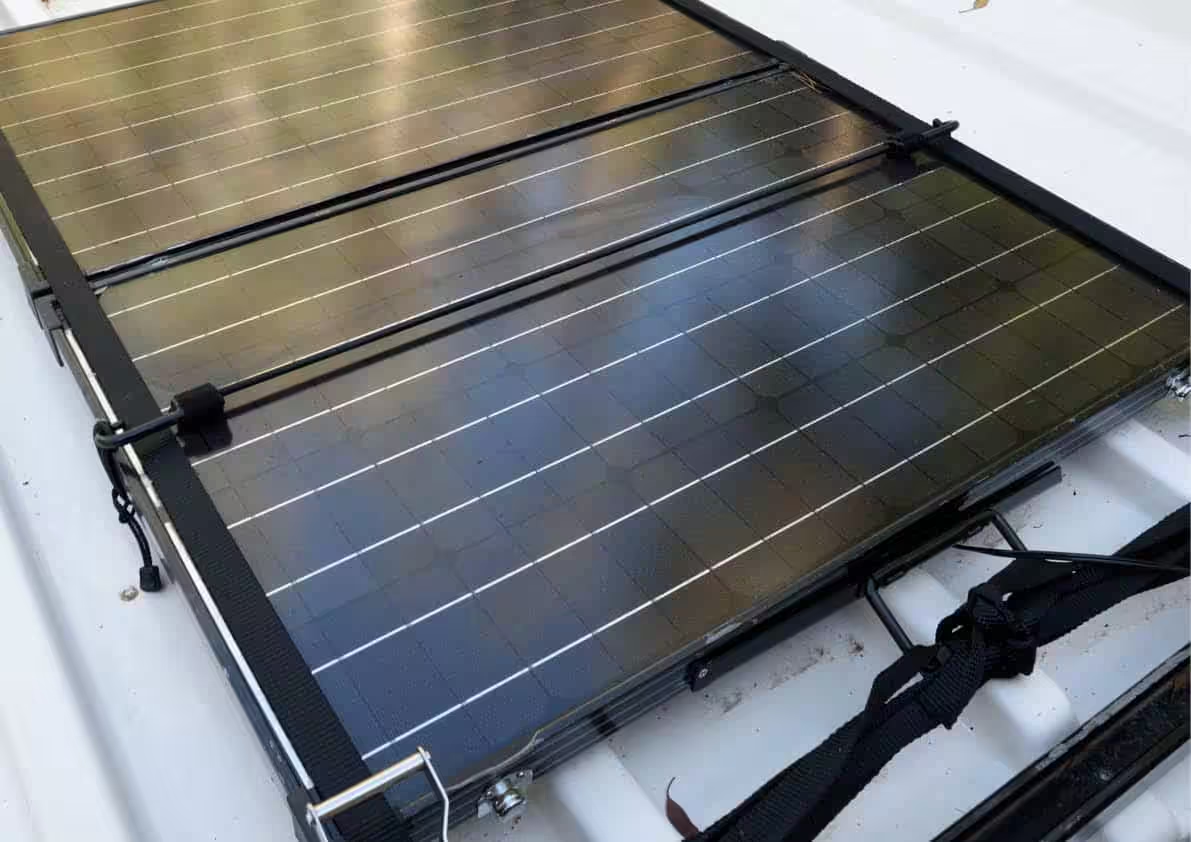
As part of the rebuild we toyed with mounting a Projecta 120-watt solar panel on the roof. With very limited time, we held it in place with ratchet straps, but worried that the straps blocked the edges of the panel too much, which would restrict the panel from charging properly.
Once back in Melbourne we did the testing and, yep, there was very little charge going into the panel. After a re-think we decided we needed a different mounting system to gain the maximum amount of charge from the sun.
The Plan
Many campers and caravans sit around for a lot of the year and even disconnecting the batteries doesn’t stop them from slowly discharging – especially in cold weather.
One way to keep the batteries charged is to plug in a 240-volt charger with a unit that can be left on safely. This will trickle charge the batteries so they are ready to go when you need them. Modern solar systems are very effective when it comes time to charging from the sun’s rays but if it’s cloudy or the camper is covered, or stored in a shed – well, they’re useless.
My plan was a multi-pronged attack. The ability to charge off 240V is easy, and the new ICD25 DC/Solar dual-battery charger from Projecta that we installed allows for solar charging or charging via a vehicle’s alternator in sync. This means while driving we can achieve maximum charge from the solar or the car battery, and if the camper is open or parked under cover I can move the panel into the sun to charge the batteries.
The Fit Up
The Ultimate had two horizontal roof rails fitted on the lid as standard so at the factory we fitted two more rails the width of the panel running front to back for it to sit on, which didn’t work as well as I’d hoped. We have ended up with two 40mm by 3mm aluminium L-shaped pieces to support the panel north to south. We used all stainless-steel fittings where possible to handle being out in the weather.
We cut the angle to size and rounded off the sharp edges then measured the lug-holes to lock the panel in place. After gluing on some rubber strips to take out any vibration in the panel, the job was done. We had previously run Anderson plugs and wiring from the back of the camper to the battery box internally so we could plug the panel in while it’s on the roof. We also made a long lead to enable us to run the panel into the sun if the camper was set up in the shade. One final switch was required on the panel controller to allow the panel to work through the solar charger unit in the camper and the battery system on the vehicle correctly.
The other job we did was to wire an Anderson plug from the front of the Cruiser to the vehicle’s battery, which enables me to use the solar panel for in car charging while travelling in remote locations without the camper.
The final wash up is we can now get the panel on and off relatively easily. We can get some decent charge while the panel is in full sun and a trickle charge if cloudy while the battery is stored under the carport, which should be enough to keep the batteries alive during the warmer months. If we get too much cloud then I have the ability to top up the batteries with 240V making this system pretty easy to manage.
Having said all that we now have to find time to get away more often and escape the 240V rat race!
Pricing
Projecta SPP120K, 120W Bi-Fold solar panel kit
$499
Projecta IC1500 240V battery charger
$320
Projecta ICD25 DC/Solar dual battery charger
$349